

Welcome to the fourth and final post in our series on beamforming microphones and use cases for lobe aiming. In this segment, we’ll discuss use cases for lobe aiming.
For optimal sound pickup, aim lobes where talkers are likely to be, and exclude areas of high ambient noise or sources of reverberation. However, as with most things in AV, there are tradeoffs to consider. For instance, if there’s a whiteboard in the room, should the lobe be aimed where a person’s sitting, aim a second lobe at the whiteboard, or use a wider lobe to cover both areas?
There’s also a common misconception in the pro AV industry that you should always use as many lobes as possible. Yes, there are certainly scenarios where using all available lobes is desirable, but there are also instances where using fewer lobes may result in broader and more consistent coverage, as we’ll see in the following use cases.
For these use cases, our example beamforming array will support up to 8 separate lobes.
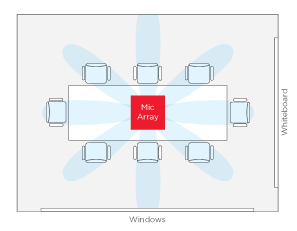
Scenario #1: Conference room with centrally located table and mic array
Unimproved solution
The center of attention is the center of the table – meeting participants will primarily be looking at one another when speaking. Using eight narrow lobes, one per chair, leaves a lot of space in the room without good microphone coverage. The interstices between the beams (the gray areas) are the parts of the room where speech will be attenuated by 12dB or more. This potentially poses a problem if the chairs are on wheels, or meeting attendees move back and forth from the whiteboard.
Improved solution
One possible solution is to vary the beam widths (many beamforming microphones offer a narrow, medium, or wide lobe pattern) to cover the gaps. One common solution is a three- or four-leaf clover pattern.
Another issue, though, is lobe overlap. Typically, the less off-axis noise or unwanted sound, the better. Some overlap is acceptable, but if there’s too much overlap, you may hear switching between the lobes or the person’s timbre change. In addition, when the lobes are summed, the duplicate speech may not be eliminated entirely, and comb filtering may result.

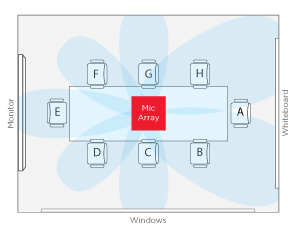
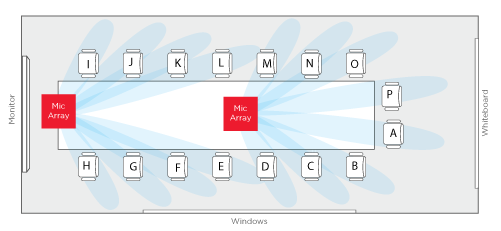
Scenario #2: Conference room primarily used for videoconferencing
Unimproved solution
In this scenario, the center of attention is the monitor – meeting participants will primarily be looking at it when speaking. If a talker has their back to the beamforming mic, their speech will be greatly attenuated (participants C, D, F, and G will be 90° or more off-axis). No one is likely to sit in the chair closest to the monitor, so that particular lobe is not needed.
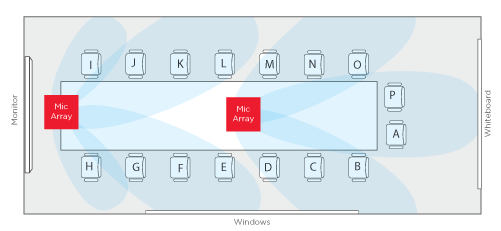
Improved solution
If possible, move the microphone towards the monitor (keep in mind the signal-to-noise ratio (SNR) increases the further the mic is from the talker). This allows the lobes to be pointed at all of the potential talkers. Most people remain seated during a video conference, so narrow lobes may be adequate, but use of the whiteboard needs to be considered.

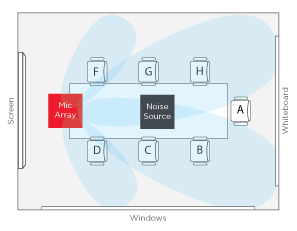
Scenario #3: Conference room with a mechanical noise source
Unimproved solution
Electrical equipment in the room such as a PC or AV gear is likely to emit a fair amount of fan noise and other unwanted sounds. The constant nature of the noise means that at least one lobe will remain active regardless of who’s talking, so anyone listening will hear both the talker and the noise, resulting in a suboptimal experience. Also, the narrower the shotgun polar pattern, the more pronounced the side and back lobes become. For ceiling microphones, you can potentially pick up mechanical noise (primarily HVAC) from above the ceiling tile.
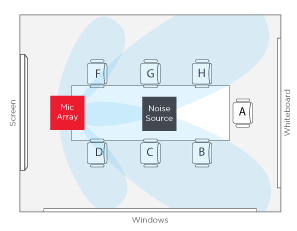
Improved solution
Eliminating the noise source entirely is ideal. That’s not always an option, though, such as in the case where the noise source is the HVAC system. Physically separating the microphone from the noise source is the next step. If the audio is still unacceptable, place the noise source off-axis between two lobes. That will greatly attenuate the unwanted sound. To minimize mechanical noise from above the ceiling, apply an acoustically absorbent material on top of the microphone. HVAC noise increases over time, so the best the system will sound is what it sounds like today – set your customer’s expectations accordingly. HVAC also introduces vibration noise across the ceiling tiles, so applying material between the microphone and the drop ceiling to absorb and minimize the vibrations is also recommended.
If the room is used for videoconferencing and a ceiling projector is being used, you may need to install a second microphone for Chair A since that seat may be outside of lobe coverage.
Scenario #4: Large multi-use space requiring two or more beamforming mics
Unimproved solution
This scenario suffers from some of the same problems as the first scenario, only with more lobes. Using narrow lobes, one per chair, leaves a lot of space in the room without good microphone coverage. The interstices between the beams (the gray areas) are the parts of the room where, essentially, speech will be attenuated. The significant number of lobes also increases the chances of a comb filter occurring if a talker is picked up by more than one lobe.
Improved solution
Lobes should only be aimed where talkers are likely to be. In the case of an executive boardroom with a large table, there’s no value in pointing lobes from each mic towards the other, since there will never be a talker in that area. Another consideration is whether the room will hold more participants than chairs (it will happen at some point). Narrow lobes will not pick up the additional attendees sitting/standing around the perimeter of the room.
Key Takeaways
Beamforming microphones are becoming increasingly popular for conferencing applications – beamforming ceiling microphones in particular– due in part to aesthetics and the trend of reducing/removing technology from the tabletop. However, using more lobes doesn’t always equate to improved speech intelligibility or consistency of coverage. Using too few lobes isn’t ideal either – you’ll pick up a lot of unwanted signals and noise. In spaces where talkers move around a lot, then a handful of wide lobes may be more suitable than a bevy of narrow lobes.
Consider these suggestions when designing lobes for the best possible results:
- Aim lobes at the areas where the talkers are likely to be located
- Don’t automatically assign each chair in the room its own lobe – sometimes that’s ideal but sometimes it isn’t
- Understand the primary use case for the room, then use the fewest possible number of lobes to cover the desired area while also maintaining an acceptable STI (typically 0.66 or higher)
- Don’t be afraid to use Medium or Wide lobes – instead, start with them, and move to narrow lobes when needed
- Delete any unused lobes
- Use presets to reconfigure the lobes based on how the room is being used (size of the meeting, reconfigurable walls, etc.)
- Listen and adjust as needed to achieve optimal sound quality
- Consult with the microphone and DSP manufacturers’ tech support during the design phase for tips and tricks to optimize the audio quality
Additional Resources
AP-112 Acoustical Ambient Noise (pages 18-23)
AV Design Reference Manual (chapter 11)
AV Systems Performance Verification Checklist
Comb Filters
Microphone Placement
Microphone Sensitivity